Feta and Olive Slider Delight
Highlighted under: Comfort Meal Recipes
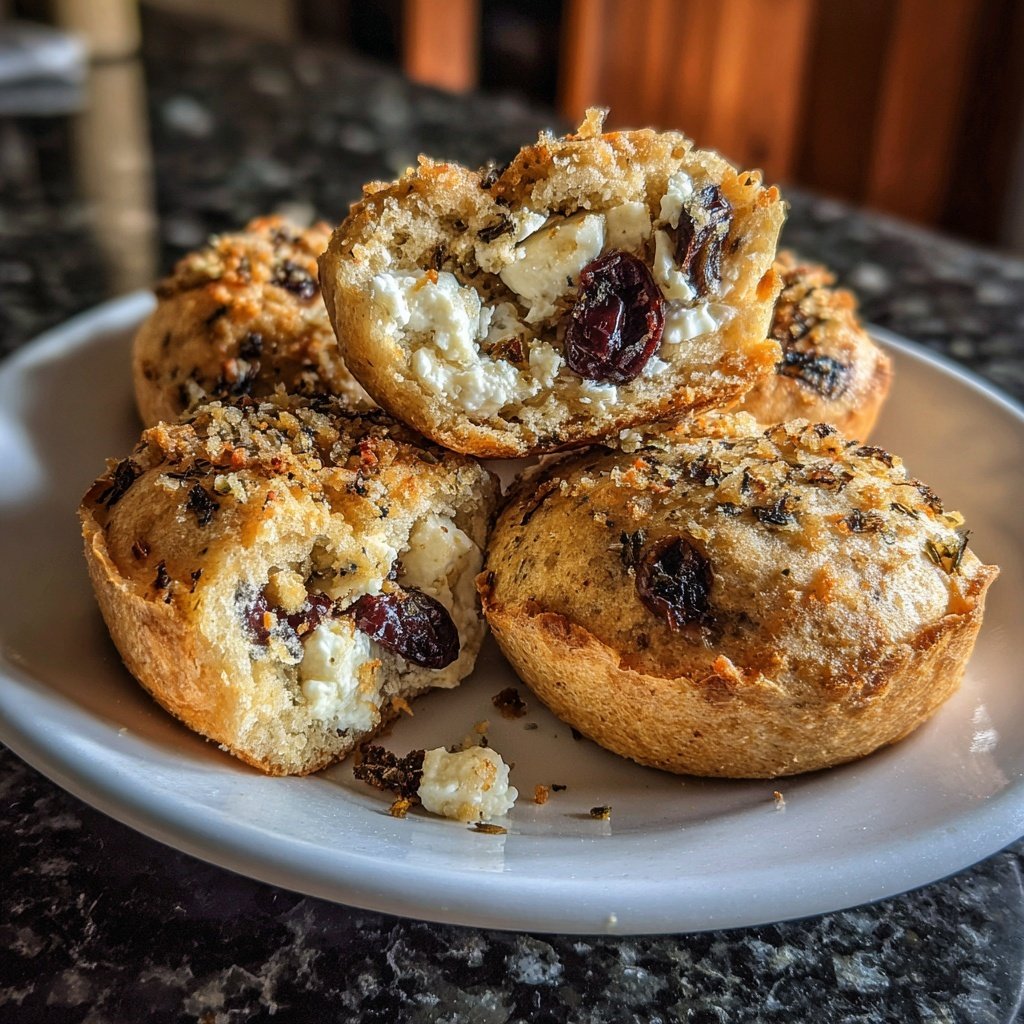
I absolutely love this Feta and Olive Slider Delight! It combines toppings that burst with flavor, providing a savory treat perfect for any gathering. The creamy feta contrasts delightfully with the tangy olives, all cradled in a fluffy slider bun. I whipped these up for a recent picnic, and they vanished within moments! The mix of textures and tastes is what keeps everyone coming back for more. Plus, they’re fun to assemble, making them a great choice for a cooking session with friends.
Creating the Feta and Olive Slider Delight was an enjoyable culinary adventure! I initially experimented with various toppings but found the combination of feta and olives offered the perfect balance of creaminess and saltiness. The key is to use fresh ingredients to elevate the flavors to a whole new level.
This slider is not just delicious; it’s also quick to prepare. I recommend lightly toasting the slider buns before assembling them; this simple step adds an incredible crunch that contrasts beautifully with the creamy filling, ensuring every bite is satisfying.
Why You'll Love This Recipe
- Creamy feta cheese that melts in your mouth
- Savory olives that add a burst of flavor
- Perfect for parties or a casual snack
Elevating the Flavor Profile
The combination of feta and olives in this slider is key to its flavor profile. Feta cheese adds creaminess and a hint of tanginess, while the olives provide a briny, savory kick. When choosing olives, consider a mix of both black and green varieties; each offers its unique taste and texture, enhancing the overall experience. You can also experiment with different types of olives—Kalamata for a rich, fruity note or Castelvetrano for a sweeter, buttery flavor.
To ensure your filling reaches its optimal flavor, let it sit for about 15-30 minutes after mixing. This resting time allows the oregano and olive oil to infuse throughout the feta and olives, resulting in a more cohesive taste. If you’re short on time, gently warming the mixture in a small saucepan can help release those flavors faster, but be careful not to melt the feta completely.
Toast to Perfection
Toasting the assembled sliders is an optional but highly recommended step. Not only does it enhance the texture, giving you a delightful crunch, but it also warms the filling slightly, maximizing flavor. Use a non-stick skillet over medium heat and toast each side for about 2-3 minutes, or until golden brown. Keep an eye on them to avoid burning; this is a fine line between crunchy and charred!
If you prefer a softer bite, you can skip toasting altogether. Alternatively, if you want a more robust flavor, consider adding a layer of garlic butter to the buns before toasting. Simply mix softened butter with minced garlic and spread it on the inside surfaces of the buns for an aromatic twist.
Serving and Variations
These sliders are best served warm, immediately after preparation. Pair them with a refreshing dipping sauce, such as a yogurt-based dip or a zesty tzatziki, to complement the tangy flavors of the feta and olives. Additionally, a light side salad with mixed greens can provide a nice contrast, balancing the rich filling and enhancing the meal's freshness.
For a twist on the classic slider, consider adding roasted red peppers or sun-dried tomatoes to the filling for an extra layer of flavor. Vegetarians can enjoy this dish as is, but if you want to add protein, feel free to include sliced grilled chicken or turkey for a heartier option, making the sliders even more satisfying.
Ingredients
Gather your ingredients for a delightful slider experience!
Ingredients
- 4 slider buns
- 100g feta cheese, crumbled
- 50g black olives, chopped
- 50g green olives, chopped
- 2 tablespoons olive oil
- 1 teaspoon dried oregano
- Salt and pepper to taste
Make sure all your ingredients are ready to go!

Instructions
Follow these steps to create your sliders.
Prepare the Filling
In a mixing bowl, combine the crumbled feta cheese, chopped black and green olives, olive oil, dried oregano, salt, and pepper. Mix well until all ingredients are thoroughly combined.
Assemble the Sliders
Slice the slider buns in half. Spoon a generous amount of the feta and olive filling onto the bottom half of each bun. Place the top halves on to close the sliders.
Toast the Sliders
If desired, toast the assembled sliders in a skillet over medium heat for 2-3 minutes until golden brown. This step adds a lovely crunch!
Serve
Serve immediately, preferably with your favorite dipping sauce or a side salad.
Enjoy your delicious creation!
Pro Tips
- For a bit of heat, consider adding some chopped jalapeños or a sprinkle of chili flakes to the filling mixture.
Storage and Reheating Tips
If you have leftovers, store the assembled sliders in an airtight container in the refrigerator. While they can last up to 3-4 days, the buns may become soggy due to the filling. To combat this, consider storing the filling separately and assembling sliders just before serving for optimal freshness and texture.
Reheating is simple; preheat your oven to 350°F (175°C) and place the sliders on a baking tray for about 10 minutes, or until warmed through. This method helps restore some crispness to the buns, allowing you to enjoy them almost as if they were freshly made.
Scaling Up the Recipe
This slider recipe is easily scalable for larger gatherings. To prepare more sliders, simply multiply the quantity of ingredients while maintaining the same ratios. For gatherings of 10 or more, I recommend using a large baking sheet to toast multiple sliders at once, which can save time and ensure even toasting.
Additionally, consider pre-mixing the filling a day ahead of time and refrigerating it. This not only saves you prep time on the day of your event but also allows the flavors to meld further, enhancing the overall taste of your sliders.
Questions About Recipes
→ Can I make these sliders ahead of time?
Yes, you can prepare the filling a day in advance and assemble the sliders just before serving.
→ What other ingredients can I add?
Feel free to experiment with roasted red peppers, fresh herbs, or grilled vegetables for added flavor.
→ Are these sliders suitable for a vegan diet?
To make them vegan, substitute feta with a plant-based alternative and ensure the buns are also vegan-friendly.
→ How do I store leftovers?
Store leftover sliders in an airtight container in the refrigerator for up to 2 days. Reheat them gently before serving.
Feta and Olive Slider Delight
Created by: The Servesavor Team
Recipe Type: Comfort Meal Recipes
Skill Level: Easy
Final Quantity: 4 sliders
What You'll Need
Ingredients
- 4 slider buns
- 100g feta cheese, crumbled
- 50g black olives, chopped
- 50g green olives, chopped
- 2 tablespoons olive oil
- 1 teaspoon dried oregano
- Salt and pepper to taste
How-To Steps
In a mixing bowl, combine the crumbled feta cheese, chopped black and green olives, olive oil, dried oregano, salt, and pepper. Mix well until all ingredients are thoroughly combined.
Slice the slider buns in half. Spoon a generous amount of the feta and olive filling onto the bottom half of each bun. Place the top halves on to close the sliders.
If desired, toast the assembled sliders in a skillet over medium heat for 2-3 minutes until golden brown. This step adds a lovely crunch!
Serve immediately, preferably with your favorite dipping sauce or a side salad.
Extra Tips
- For a bit of heat, consider adding some chopped jalapeños or a sprinkle of chili flakes to the filling mixture.
Nutritional Breakdown (Per Serving)
- Calories: 250 kcal
- Total Fat: 12g
- Saturated Fat: 4g
- Cholesterol: 30mg
- Sodium: 530mg
- Total Carbohydrates: 30g
- Dietary Fiber: 1g
- Sugars: 1g
- Protein: 6g